Showing posts with label Chocolate. Show all posts

Tuesday, February 3, 2015

Ultimate Gummy Bear Cake

This has got to be one of the most outrages and memorable cakes I've made this year, and it's only February! I got the order for a gummy bear encrusted cake. Sounds simple enough except it had to be colour sorted and arranged in rainbow layers. One thing you don't realise is how many gummy bears it takes to cover a 11" round cake that is 8" high. Like a lot!

More Gummy Bears Than You Can Count

Assembling this cake was thoroughly therapeutic, though I realised this is one of those OCD nightmare situation - not a colour out of place, no alignment issues and no missing spots please. When I was finally done, it was nothing short of a bejeweled armour - a squishy, chewy, fruity one.

Bejeweled Blitz

The cake is a 4-layer moist chocolate cake covered in a satiny Swiss Meringue Buttercream. It was Mummy E who suggested a dark cake inside to contrast the colourful bright outside. The result was stunning. The kids went wild, of course.

Chocolate Surprise

If you were at the Candylicious boutique over the weekend and wondered where all the gummy bears went, well, now you know.


Wednesday, December 11, 2013

Ty-saurus Rex

I seem to be getting an opportunity to have another go at cakes I've made earlier in the year. This time round is another dinosaur cake and cupcakes with dino toppers. I made the exact same order in February for a 3-year-old dinosaur enthusiast, this time it's for a T-Rex-loving one-year-old.

Mummy R sent me her invitations and party favours for a feel of the theme and colour. She also sent some cake ideas but when I finally showed her my first dino cake, she was more or less sold. She liked the 2D design and wanted a speech bubble that said "Rawrr"!

I made some variations on the dinosaur. I decided to replicate what she had on the invitation - a forest green T-Rex showcasing some serious serrated chompers. But before I embarked on the cake, Mummy K asked me to make a quick draft of how the cake would look like. To be honest, I always get a bit embarrassed about having to draw anything. I really can't draw to save my life... I can't explain why I can then create the stuff I do with fondant. It's one of the mysteries in my life.

Still, I made an attempt to draw T-Rex going "Rawrr", with the caveat that the cake will be a LOT better than the draft ;p

My piece de resistance

I think we all had a good laugh upon seeing the draft. Well, it didn't deter Mummy R from going ahead with the order (brave Mama).

Here's Tyler's invite...

Tyler's T-Rex Party

And here's the cake...

Rawrr!

I used the same embellishments as the last time, which is the chocolate wafer sticks for the wooded forest look, but I made it a little different by interspersing it with fondant leaves and green grass frosting.

Happy Birthday Tyler

Mummy R also asked me a question a lot of mummies enquire about - can my one-year-old eat the chocolate cake? Well I'm not the authority on kids' nutrition, but I do think a bit of cake on your bub's 1st birthday is kosher unless your little one has dairy allergies or gluten intolerance. Just give the cake minus the ganache. Personally, I think if your child has not had any sweets before, then chocolate is a good option as an introduction as compared to candy.


Tuesday, October 15, 2013

O Canada!

For a country that's half way around the world from Singapore, I have to say Canada has made some impressions in my life. Well for a start, I've had family there over the years so every now and then I'll hear about aunts, uncles and cousins who have set up home in the great white north. Then when I was at RD, one of my bosses who played a significant role in my journalism career is Canadian. He was a bear of a guy who wrote with his heart. There was Canuck jokes you don't always get but there's something 'aboot' him that's salt of the earth. I wrote some of my best pieces with him.

When I got married, my husband wanted me to experience premiere skiing for our honeymoon. We headed to Whistler, British Columbia. I'm all for skiing except the green slopes in Whistler were more like intermediate blue slopes everywhere else in the world. Plus it registered -25 degrees that year. I nearly died but it was one hell of a memorable trip.

One of my favourite confection to make when I first started baking was a no-bake three-layer bar of chocolate crumb base, followed by a layer of buttercream custard and topped with a rich dark chocolate ganache. It's called a Nanaimo bar, apparently a popular Canadian dessert that is named after the city of Nanaimo in British Columbia.

Nanaimo Squares

So when I got a call to make a batch of brownies with little Canadian flags as toppers, I was chuffed. I don't usually get orders for brownies. The lady who ordered these was one of the recipients of Daniel's cupcakes. She really liked the toppers and enjoyed the cupcake, so she got in touch for some customised brownies. I have a trusty recipe that yields a rich dense brownie with a shiny cracked top that is crumbly. I had forgotten how much I enjoy making these.

Canadian Chocolate Bar

The flags were handmade. Little red maple leaves printed, cut and then pasted on red art card and affixed on toothpicks. Each flag adorned the brownies that's topped with a swirl of ganache. Check out how I made those flags.

Stick it

Paste it

Flag it


Friday, July 5, 2013

Tayo Buses Make Cool Cakes

A former colleague who's been following my cakes saw the first Tayo cake I made and commented on how his boy loves Tayo the Little Bus too! My brood at home are fans as well, and I almost don't know any little lad who doesn't like the cheery Korean vehicular animation. It's such a hit!

So naturally when Baby A's 2nd birthday rolled around, I got the call for a Tayo cake. Daddy D was pretty cool about leaving the design to me, we both sort of figured that when you're 2, as long as you see the toy you like on a cake, it's the best birthday cake ever! With that, I recommended to get the toys to decorate the cake with.

With the previous Tayo cake, I found out you could buy Tayo toys from the website qoo10.sg. So I went on it to find the toy topper for the cake I had in mind - a set of four Tayo and friends buses
Then I crafted the 'bus terminal' with cake - a rectangular block with a red roof and four colourful garage doors from which the buses emerge!

The cake is a triple layer eggless chocolate cake; Mummy H informed me that Baby A was allergic to eggs. Luckily, I had a wonderful eggless chocolate cake recipe so the birthday boy wouldn't need to miss out on his own cake ; )

Buses and Cake


I was told the kids loved the cake, I suspect the toy buses had something to do with it. Imagine a bunch of 2-3 year olds trying to get their hands on it. The adults had a hard time keeping them away before the candles were blown out. Then it was sweet treats and fun toys for all!

Tayo and friends

Happy Birthday Akira


Sunday, February 3, 2013

Dinosaur Rocks!

(Ryuu's Birthday Cakes - Part II)

Besides the Hungry Caterpillar, the birthday boy also loves dinosaurs! I heard he got into them because his mummy liked exposing him to factually correct content (as oppose to mindless cartoon, I guess). I think that's the way to go. 

For the party at home, my friend wanted her son to have a round cake to cut plus some cupcakes for easy takeaways. She sent me some ideas and I quickly fell in love with a cute looking dino stringing a red balloon along.

Cute-saurus

I'm not sure what 'saurus' I made but I did check against the list and it looks like the fearsome Ceratosaurus - for those of you who are interested, it's a large predatory theropod from the late Jurassic period. This one just happens to look damn adorable! It also contains a rich dark chocolate cake with Oreo cream cheese filling!

I was thinking how best to decorate the sides of the cake when inspiration hit me while shopping for Chinese New Year goodies. I love those crispy wafer sticks with chocolate cream in them and I thought they also look like tree trunks or wooden twigs. So I bought a box, had the sticks cut to varying lengths and lined them all around the sides. It looks a bit like a wood forest.

Jurassic Cake

Then I spotted a bottle of chocolate rocks and it was a no-brainer. I had it scattered all around to cover the board. It was all the decoration you'd love to eat ; )

That was not the end of my dinosaur discovery. I felt a bit like a Palaeontologist as I scoured for dinosaur toppers that can go onto the cupcakes. This took me to the Party City shop at Raffles City where they carried a whole range of dinosaur party ware. They had the cutest dinosaur toy ring and it comes in a pack of 12. What a find!

To mount them, I used those yummy wafers again so I could get them to prop up nicely on top of the cupcake. It sat handsomely on the Oreo cream cheese swirl.

Topper-saurus

Look ma... there's a dinosaur on my cupcake!

Did you know that Johnny Cash had a song called the "Dinosaur Song"? I know I'm digressing but when I was googling for all of this, I came across the song and it's fascinating. Check it out - Johnny Cash Children's Album

Sunday, January 27, 2013

Lightning McQueen

The little boy who introduced Thomas the Train to my Jake has a new toy interest - Lightning McQueen from Disney's Cars. Jake's cousin, Justin turns 4 and luckily for his mum, she did not have to endure another year of Thomas birthday party. So Aunty Debbie was tasked with baking a Lightning McQueen cake!

Before I started work, I contacted my baker friend Dawn who made a Lightning McQueen cake some months back. Now if you remember, Dawn is my fellow baker mum who helped me on the Penguin cake last year. Dawn's cake decoration skills is easily the very best that I've seen anywhere. Pure perfection. I had hoped some tips from her would help me along the way. She sent me a step-by-step via WhatsApp from Shanghai where she is based, thank you so much Dawn. Here's a peek at her amazing work... check out the contours!

A perfect Lightning McQueen by Dawn

So I went about building this cake. The baking part was easy - a moist chocolate cake with Oreo cream cheese filing. I had to stop myself from eating the bits that were carved out while making this cake! 

Yummy undercarriage

Rough outline of McQueen covered in fudge

I tried so hard to follow the tips and advice given for this cake. It was a challenge carving a car out of a block of cake, which was recommended. I found myself piecing together the car for the contours instead. So between meeting the requirements of a moist cake and the details required for the car to take shape, this was my best effort.

Lightning McQueen!

Adding in the details was the real fun part especially the round disc on the bonnet. I used it to imprint the birthday boy's name! 

Here's looking at you kid

Ok so it's not really an accurate shape of Lightning McQueen, mine is more like a family saloon than a sports car but the signature windscreen eyes and engine grille smile did the trick. And not forgetting the lightning stripes on the door!

Vroom!

A Lightning McQueen that he can eat

It made the birthday boy's day and that's all that really matters. Happy Birthday Justin!

Monday, January 7, 2013

Setting the Stage

If my first cake of 2013 is anything to go by, it's going to be an interesting year ahead!

I was contacted by a Betty Boop fan for a cake of her favourite character but I only had 2 days to deliver so I suggested a simple flat fondant cutout of the burlesque flapper girl on the cake. She really wanted the character in 3D so she had an idea - have one of her Betty Boop porcelain figurines placed on the cake! I was a bit apprehensive at first but there is absolutely nothing wrong with a porcelain cake topper as long as you're very careful.

She went on to send me a few images of her Betty Boop figurine collection - she has many! and they are gorgeous ; ) I was also quite sure I'd have had a hard time replicating it as perfectly in fondant. I decided to pick one of Betty Boop kneeling on a star with the caption You're a Star


So essentially, I'm just setting the stage (in this case, one made of cake) for Betty Boop to step up on. The colour scheme is of course black and red and my client had wanted a rainbow cake. I thought it would be more stunning if she could cut into alternating layers of black and red cake instead! So I suggested layers of dark chocolate cake and red vanilla butter cake with cream cheese frosting.

The best of both worlds

It's a tall cake. I had it covered in white fondant and embellished with red and black hearts and floral cutouts. Then I had a plastic dowel support inserted into the centre of the cake and topped it off with a round plastic disc on which the figurine would sit without ruining the cake.

I also wanted to incorporate a design with stars as it would really look like a stage if there's a splay of stars around the figurine. I had some fondant stars cut out and attached them to springy wires so it could be the background for Betty Boop.

Centre stage

Just add figurine

With this order, I realise that as adults we hardly indulge ourselves when it comes to birthday cakes. If you have children, it's all about what they like and their birthday cakes are the highlight of the year. In this case, my client is finally getting a birthday cake and one she's always wanted.

Happy Birthday Evelyn

Monday, December 17, 2012

Me Want Cookie!

Aha! Finally, someone's asked me to make a cookie monster cake! I was absolutely delighted as I love the Cookie Monster as much as I love Elmo and since I wanted to add to my Sesame Street characters in cake collection, I couldn't wait to do this!

It's pretty much the same as making Elmo, except Cookie Monster does not have a nose... he is however, a very distinct blue, which could easily achieved with Wilton's Royal Blue gel colour but the frosting has to be absolutely snow white! There is only one super white frosting I'd make – a fluffy meringue frosting. The result: a gorgeous blue and it looks perfect on a chocolate fudge cake.

Cookie Monster Blue

The frosting went on quite nicely, I was able to make little furry swirls with this fluffy meringue frosting. However, as it sat on the counter waiting for pick up, it started to become a little soft and was a bit too melty :( Funny thing when I did Elmo some weeks back, I didn't have this problem with the meringue frosting. It was admittedly a very humid day today but I suspect it could have something to do with the frosting having been in the fridge for a while before I added colouring.

The hubby felt my pain as I lamented at the effort wasted in creating the furry swirls, that's when he suggested adding something that would hold up in our heat! Well, the simple answer is shortening, it is the one thing that would not change no matter how hot or humid... well, it holds up in the heat for a reason and trust me, you wouldn't want to eat the stuff or worse, feed it to your kids!

Anyway, enough of my ranting... here's Cookie Monster and of course, he would not be complete without some cookies for the gobbling ; )

Happy Birthday Tristan

I made some cookie monster cupcakes too, but those were a sadder melty mess - too much frosting, too little surface area. I hope the kids enjoyed it all nonetheless... om nom nom nom


Sunday, December 9, 2012

It's BATTER @ Home

My sister was having a tea party this weekend at her place and she was hoping to serve up some freshly baked chocolate cupcakes for her guests. Short of having her own personal baker (yours truly) at the party, the next best thing was to have a ready batter where she could stick it in the oven half an hour before serving it!

Since I could not be there, I whipped up a portion of moist chocolate cake batter and provided her the cupcake tray with cupcake liners. All she needed to do was fill the cups (two-thirds full) and stick them in the oven at 175 degrees for 20 minutes and there you have it... freshly baked chocolate cupcakes that make Betty Crocker look like hard work!

She was so pleased with how it all turned out and her friends loved the cupcakes served piping hot with ice cream. She felt like almost a baker.

This gave us a brilliant idea especially for those of you who have ovens at home and always wanted to bake something yummy in it – bring batter home for the freshest baked goodies. I can prepare your cake batter packed into a convenient container, provide you with basic necessities like cupcake liners, disposable pans, temperature instructions, etc and all you have to do is bake it yourself at home.

* Just one caveat, I'm aware that the chemical reaction in leavening takes place once the ingredients are mixed and therefore should be baked soon after. The batter should be used within a few hours. Having said that, my sister stuck some batter in the fridge and baked it the next day. Result: still as good :) 

One portion of chocolate cake batter

Ready to go

My dear sister has very kindly documented her baking step by step... if she can do it, err, anyone can (sorry sis) ;p

Step 1: Fill your cupcake tray, pop it into preheated oven (175 degrees) set for 20 minutes.

Fresh cupcakes in 20 minutes

Step 2: While the cupcakes bake, chat to your guests till they smell the warm sweet wafts of baked chocolate 


Nicely done

Step 3: Serve your guests and wow them with your presentation

Chocolate cupcake with Vanilla ice cream

Let me know if you're interested to do this, I'll be more than happy to prepare the batter for home parties and I can supply everything you'll need to do this at home.

It's batter at home!

Monday, December 3, 2012

Elmo Revisted

Despite the latest bad press surrounding Elmo and his voice over, you can't take away the fact that the furry red monster is still one of the most loved children's characters of all time, and for me, that won't change no matter what. So I was glad to have the opportunity to make an Elmo cake for a friend and her daughter who celebrated their birthdays together.

A year ago, I started my baking venture and Elmo was one of my first foray into novelty cakes. I made it for Jake's 2nd birthday and back then, I remembered the task to be daunting! I spent 3 days prepping and was thrilled with how Elmo turned out - check out my old post here.

This time, the task was more enjoyable than unnerving and it only took a day. I made three layers of moist chocolate cake, assembled it with rich chocolate ganache and frosted the whole cake with a red-tinted fluffy meringue frosting. Then I cut out a piece of baking paper for the mouth before covering the cake in red fluff, much like what you'd do when painting any special corners or spots.

Frost and peel

Always good for a smile

The eyes and nose were made with fondant. They were easy shapes - 2 round balls for eyes and an egg-like shape for the nose.

Eyes without a face

Then put it all together and there you have it... Elmo :)

Happy Birthday Isabel and Eunice

Monday, September 3, 2012

Cupcakes & Toppers

The last few weeks had been all about decorative fondant cakes, so I was looking forward to this weekend's order - cupcakes and paper toppers!

This was my first order of 1st Month cakes. A mummy contacted me to make 48 chocolate cupcakes with peanut butter swirl – she obviously liked what I did with Cakes & Craft, so she suggested cupcake toppers with her baby girl's name and a simple message.

I whipped up my trusty moist chocolate cake for the cuppies and prepared that luscious peanut butter frosting that is practically unadulterated apart from Nutella for sweetness. Then I used a 2C Wilton piping tip and swirled pretty roses on top of each cupcake.


Peanut Butter Roses

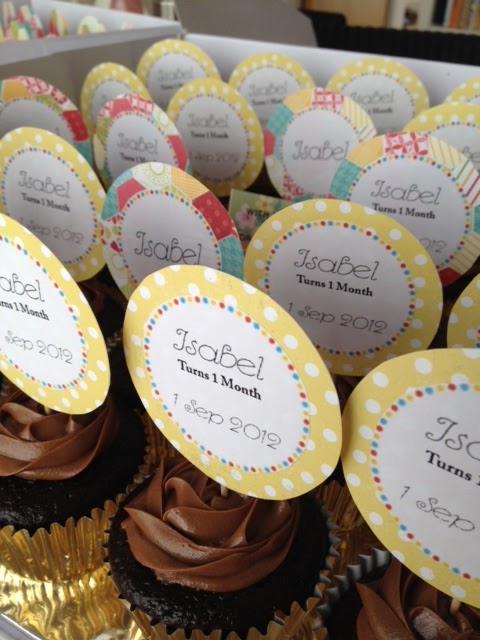
The best part about preparing this order is making a trip down to the scrapbooking shop to look for pretty paper. Instead of the usual pink for girls, the request was for buttercup yellow. So I scoured the shop for something girly and happy. Looky what I found... this lovely double-sided art card.

So happy indeed!
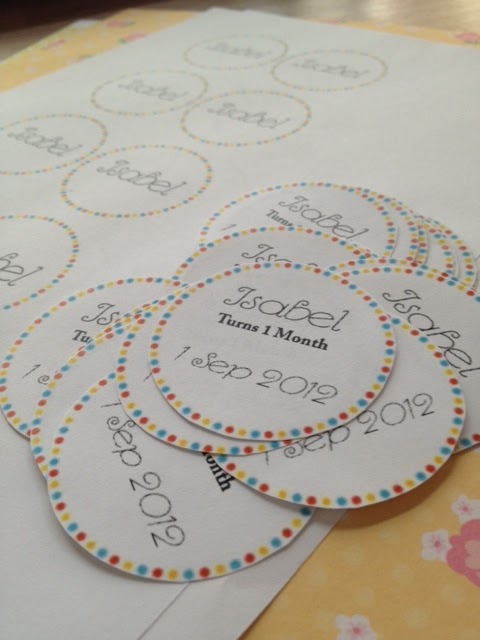
I created the round printouts with Isabel's name and date of her 1st month celebration, as requested by her mummy. It was a pretty combination with the white polka dot on yellow.

Isabel's 1st Month

Here's the complete box of cupcakes with toppers. The fun part is the double-sided pattern where I flipped the other way for variety! And the back view looks just as good too ; )

All lined up
A sweet momento

I was so pleased with completing these for delivery that I totally forgot to bring some extras promised for my client's own tasting. So mummy D, if you're reading this, you have cupcake credit with me. Call me!

Monday, August 20, 2012

A Vote of Confidence

Since I've started this baking venture, I've learnt so much about cake decoration! I was joking with a friend that it's no longer just about baking a cake anymore... you get to be a sculptor (Piggy cake), dressmaker (Barbie cake), engineer (tiered cake), and cartoon artist (Tom & Jerry). But I must admit I still have a lot to learn.

I can't express how glad I am to be given the opportunity to try my hand at making a Tom & Jerry cake. An old school friend referred a friend to me, she was looking for a Tom & Jerry cake for her two kids celebrating their birthdays together. At first, I was a bit apprehensive about the project since I haven't really done much fondant modelling work, but the challenge was irresistible. When she finally decided to go with me, I was so excited, I started practicing moulding the figurines 5 days before delivery! 

Here's the first go at Jerry...

A first attempt at Jerry

I felt Jerry's ears were too triangle...so I played plastic surgeon and had another go!

Big round ears!

Then there's Tom...

First attempt at Tom

I couldn't stop meddling with Tom actually... poor guy not only gets a whacking from Jerry but a whole lot of face-rearrangement from me! ha!

Here's the zany duo

Now since Tom was getting a hammering on the head... the hubby thought it would be funny to play with the eyes...

Seeing stars

Here's the labour of my adventure...

Two-step chocolate cake featuring Tom & Jerry
Happy Birthday Adrienne & Ethan

I'll be honest, I struggled somewhat with getting the a few things right on this cake. First, it took a bit of work to get the expressions on the figurines the way I imagined it. Then there was the fondant covering for the cake. I ended up building a bit too much cake, which weighed in at about 3.5kg. This called for a VERY large sheet of fondant and I had trouble rolling it out. But looking at the result, I think it was a decent effort. Now I'm secretly wishing for a fondant rolling machine!

I'm so blessed to meet many people who have been so encouraging and kind towards this baking project of mine. The opportunities have been amazing and I'm constantly surprised at what I can create. Thanks A for the vote of confidence ; )