Monday, December 9, 2013

Peppa Pig

I love children's literature, it's such a great fodder for cute cake ideas. I've done a few including Dear Zoo and Hungry Caterpillar, now adding to the library is Peppa Pig!

A friendly neighbour who has 2 little boys just like me requested for a Peppa Pig cake for her elder boy who turns 3. She had already actively researched for ideas online for the cake and wanted a 2D design fondant cake. Peppa Pig is a simple enough character as they are drawn in basic shapes with simple details. Still, it was hard deciding on a design. My son's library has a great Peppa Pig book but in the end, I couldn't resist this design that Mummy C shared...

Peppa Pig and Family

It's a neat cake with all the signature Peppa Pig narrative - sunny day, playing in the mud, Peppa with her family - little brother George, Mummy Pig and Daddy Pig.

So off I went replicating it the best I could...

Character development

Story board

From screen to cake

2D cakes are truly tons of fun to make. With the fondant cutout, it looks almost like a page out of the story book. I added a few little details like a ladybug and a simple trail of trains that can hold the candles.

Peppa Pig!
Happy Birthday Isaac!


Wednesday, December 4, 2013

Birthdays @ Home

As we enter into the last month of the year, I always get a bit contemplative. What have I put into 2013 and what did I get out of it? Well, there sure was quite a bit of travelling, mainly shuttling between S'pore and Jakarta. But mostly, it's a year of adjustment for our whole family. I think we did well and I was still able to bake and even squeeze in some freelance work!

The recent birthday celebration at home pretty much sums up our 2013 - making home in 2 places. We got back just in time from JKT (like a day before) to hold a simple party at home with friends and family, I managed to bake two cakes for my favourite boys. 

Remember that rainbow cheesecake with the colourful concentric circles? Well, I made a monochrome one for the hubby. He loves the colour blue and I made him a cheesecake in 6 hues of blue. While I was making this B, who is pedantic about colours, gave me some insights into how shading works. So it seems if I made this monochrome cake with the outer rings from dark to light, it would have a tunnel with light at the end effect. In this case, he wanted a bulls-eye effect - so outer rings from light to dark. 

Blue Cheesecake
Happy Birthday B

And here's what my 4 year-old big boy got...

Cake on Fire!

Happy Birthday Jake

So our little guy has a new obsession - Hot Wheels! Where I used to have a gazillion Thomas the Train toys strewn all over the house, it's now little die cast cars. This cake allowed him to add 4 more Hot Wheels cars to his collection, needless to say it's the best birthday ever! Till next year, I say :)


Tuesday, November 26, 2013

Building Castles in a Cake

In the beginning of the year, I made a boy castle cake and met with some construction challenges. So when another request for a castle came along, I was ready to roll my sleeves up and try again!

Mummy E got in touch with a very straight forward brief - a castle cake with turrets, and cobblestone-textured walls for the castle exterior. Her boy is a big fan of dragon-slaying knights and they have an awesome collection of toys that could be used for a birthday cake, now all that's needed is a castle.

There are many places to draw inspiration from. Mummy E sent me some examples of what she envisioned for the cake. I also looked to my boys' toy corner and actually found this Melissa & Doug castle that had just the right turret design.

Melissa & Doug Castle

I was going to make a square base and stack it up 3 times, with turret towers. I usually turn to ice cream cones when it comes to building castles but Mummy E didn't want the conical type castle so she suggested using paper towel rolls to construct the height of the turret - excellent idea!

The one important tool in this cake project is the embossing mat for the cobblestone texture. I wanted to buy it online as I was out of town while planning this cake with Mummy E. In the end, it was available at Kitchen Capers in Singapore, they have a good one because it comes in a large sheet. For those of you interested here's the link. Mummy E very kindly bought it and left it with me.

I made the turrets 2 days in advance so it would dry out nicely. It was a bit tricky to make fondant adhere to cardboard but with some careful moulding it was doable.

A lot of grey fondant was used, there was little need for any other colour. But having said that, I applied a technique I learnt at a fondant figurine class - shading!

Here's the castle before I applied shading...

Castle Grey

Closer look at the embossed texture

And here's the castle after shading...


Shady Castle

Elijah's Castle

Now with Elijah's knights and dragon characters, it all comes to live!

Happy Birthday Elijah!

Wednesday, November 6, 2013

Tayo and the Traffic Lights

I had the pleasure of making yet another Tayo cake but this one had a very special request. The little boy who is celebrating his 5th birthday has a thing for traffic lights. I totally get that because my two rascals are equally enthusiastic about traffic lights. My younger one may have just turned 2 but he is able to say "Red means STOP! Green means GO Mama Go Go GO!" So when Mummy L requested for traffic lights including the overhead kind, I totally understand :)

Mummy L was also very proactive in working on the design with me. She wanted a zebra crossing as well. I didn't know before but in the Tayo cartoon, little chicks would cross the road so she requested for those to be part of the cake. Just to be clear, she even helped me to envision the design with a powerpoint draft!

Mummy L's draft

The main challenge for me was the overhead traffic light. Gum paste may do the trick but the weight would make it unstable since the structure would be cantilevered... where is the Hubby when you need him. Then I looked around my supplies and came across simple black straws - Eureka! The straw could be bent and that was where I added on the traffic light detail with art paper.  The other two traffic lights were made out of gum paste and supported by lollipop sticks.

The birthday boy was very observant, he told his mummy that I got the overhead traffic light sequence wrong! It should be green on the inside then amber and red. Good spot Isaac! You really know your lights ; )

A scene from Tayo the Little Bus

I had the most fun making that zebra crossing. There is something about black fondant, I really love working with it. Any details that is set upon the black pops out and the contrast looks fantastic. When I positioned those 3 little chicks on the zebra crossing, I was so pleased with how it all turned out.


Pedestrian chicks

 Happy Birthday Isaac!


Monday, November 4, 2013

My Little Pony Mania

October was the month of My Little Pony cakes! It seemed like every mummy who got in touch with me requested for the pretty ponies for their little ones. I think the rainbow coloured ponies must be enjoying some kind of resurgence in popularity because even McDonald's is packaging their Happy Meals with My Little Pony toys.

I was very happy to make these MLP cakes again as I really enjoyed my first effort for a friend's daughter some time back. I made a total of 4 MLP cakes, with one special order for sisters who were celebrating their birthdays together so I made two cakes with a connecting rainbow! A bit of fondant engineering challenge there.

Here are the 4 cakes...

1. Giselle's 1st Birthday

Simple and Sweet

This cake ordered by Mummy V is a bit of a rehash of my first MLP cake. She didn't want 3D fondant nor toppers so I went with this 2D version of 'Sweetie Belle'. I love make the My Little Pony this way as it stands out enough to make an impact on the cake. I especially love the flowing mane! This was a simple orange sponge cake for a small party.


2. Matilda's 1st Birthday

Field of ponies

A friend wanted the MLP theme for her daughter's first birthday. They had the party decorated with all things pony from the banners to the goodie bags, piñata and even labels the drink bottles! Naturally, a MLP cake would complete the celebration. Mummy M is a busy busy lady so she picked up some toppers and came by to discuss the cake with me. We decided on a rectangular cake - always good for cutting and serving up with a standing rainbow. A couple of days before the party, I went by to McDonald's to get a drink and saw the Happy Meal giving away My Little Pony figurines. It was my first Happy Meal in ages.


3. Kaira's 6th Birthday

Just add ponies

Kaira was going to have a pool party for her birthday so her mummy was a bit hesitant about a fondant cake being out in the open for some hours. Hence, they requested for a cream cake instead. Now having made fondant cakes for most orders, I was suddenly a bit lost as to how to make a standard cream cake. As you all know I don't do buttercream because I don't use shortening and butter alone won't hold in our weather, so I turned to cream cheese. This is a chocolate cake where the sides are frosted and the border piped with sweetened cream cheese that is coloured. I left the 'lane' exposed as chocolate with some green grass frosting on either side. Ask me for this if you'd like a fondant alternative.


4. Lauren and Shauna's Birthday

Little twin cakes

This cake combo is for two sisters whose birthdays are quite close so Mummy K thought to combine the celebration. Big sister Lauren gets a rainbow cake with a stream running through it, while Shauna meimei gets a elevated cloud cake. The two cakes are connected by a gum paste rainbow that straddles both cakes. The challenge here is that Mummy K had to do the assembling herself. For ease of transporting the cakes, the rainbow was not inserted and the cakes had to be assembled on site. I provided all the necessary 'tools' and here's the result of Mummy K's handiwork. Well done!


Saturday, October 19, 2013

Rainbow Cheesecake

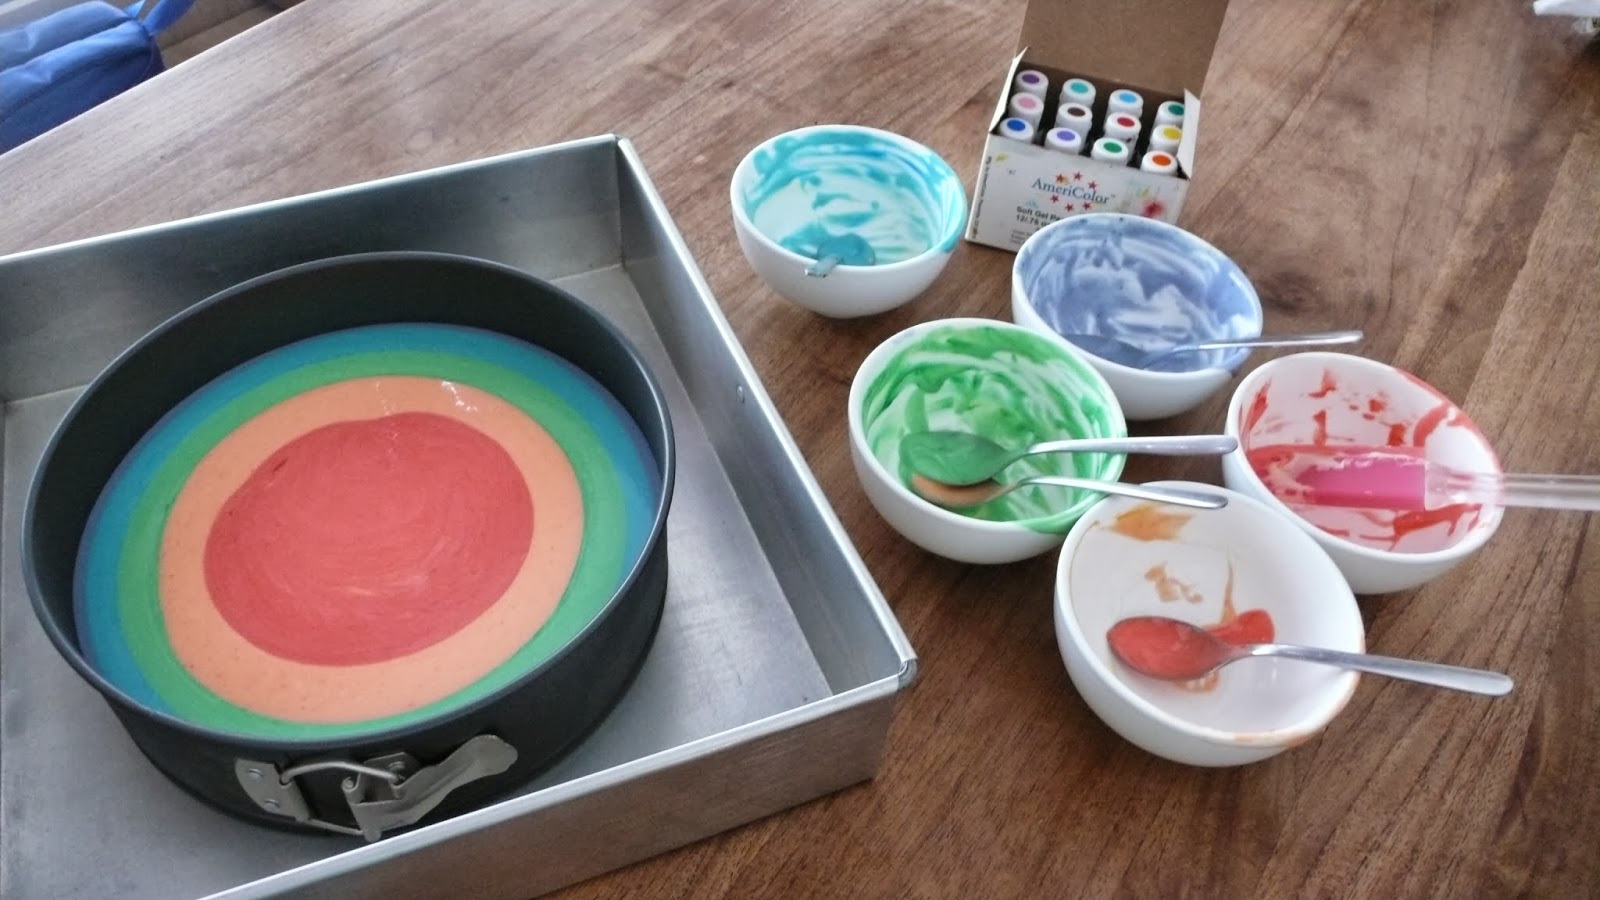
After having made more rainbow cakes than I care to count, I am now adding another spectrum to my multi layer colour baking - the Rainbow Cheesecake.

I'm not sure how many of you saw it on your Facebook feed but there was a post that was making its rounds on social media on how to make a rainbow cheesecake. It looked absolutely delicious! My sister-in-law J was the first to post the tutorial on my timeline with a message - "Make this please!"


It was a matter of time that the rainbow starts to invade all sorts of baked goods. There was no better time to try this than for my hubby's cousin's 16th birthday. Her dad had contacted me to bake something for her Sweet 16, and being family who have been recipients of my cakes on almost all occasions, I was happy to try something new for once.

I didn't care for the recipe in the tutorial. Every baker has their own cheesecake recipe - if it works, don't try to mess things up. I figured the only additional step would be adding in the food colours into the cheesecake batter.

So here goes...


Technicolor Cheesecake

The coloured batter spread like a dream. I think the next time I try this, I will make more batter to get one or two more colours in. The hubby also suggested that I could do a monochrome ombre cheesecake - Hunny, consider it done! :)

Anyway, the birthday girl was totally surprised when she saw the cake (even I couldn't stop looking at the cake after taking it out of the oven). She loves cheesecake and this was the ultimate birthday cake!

Happy Birthday Christel


Tuesday, October 15, 2013

O Canada!

For a country that's half way around the world from Singapore, I have to say Canada has made some impressions in my life. Well for a start, I've had family there over the years so every now and then I'll hear about aunts, uncles and cousins who have set up home in the great white north. Then when I was at RD, one of my bosses who played a significant role in my journalism career is Canadian. He was a bear of a guy who wrote with his heart. There was Canuck jokes you don't always get but there's something 'aboot' him that's salt of the earth. I wrote some of my best pieces with him.

When I got married, my husband wanted me to experience premiere skiing for our honeymoon. We headed to Whistler, British Columbia. I'm all for skiing except the green slopes in Whistler were more like intermediate blue slopes everywhere else in the world. Plus it registered -25 degrees that year. I nearly died but it was one hell of a memorable trip.

One of my favourite confection to make when I first started baking was a no-bake three-layer bar of chocolate crumb base, followed by a layer of buttercream custard and topped with a rich dark chocolate ganache. It's called a Nanaimo bar, apparently a popular Canadian dessert that is named after the city of Nanaimo in British Columbia.

Nanaimo Squares

So when I got a call to make a batch of brownies with little Canadian flags as toppers, I was chuffed. I don't usually get orders for brownies. The lady who ordered these was one of the recipients of Daniel's cupcakes. She really liked the toppers and enjoyed the cupcake, so she got in touch for some customised brownies. I have a trusty recipe that yields a rich dense brownie with a shiny cracked top that is crumbly. I had forgotten how much I enjoy making these.

Canadian Chocolate Bar

The flags were handmade. Little red maple leaves printed, cut and then pasted on red art card and affixed on toothpicks. Each flag adorned the brownies that's topped with a swirl of ganache. Check out how I made those flags.

Stick it

Paste it

Flag it