Saturday, September 29, 2012

Little Irish

For the longest time in my family, my niece Laura is the only girl grandchild - my brother also has two boys, and I've followed suit with 2 boys myself. So you can imagine the elation after 16 years, we are finally blessed with another little girl. My sister delivered a gorgeous bub this month and we are totally enamoured with her.

A month ago while we were eagerly awaiting her arrival, I was really hoping she'd make an appearance by 3rd September as I wanted to make sure I would be able to bake her full month cakes (I'd be away from 2nd Oct and would be very sad to miss the opportunity to bake for her).

Baby C came to us on 3rd September and this Aunty almost immediately started planning her cakes with her Mama.

So what sort of cakes do you get when you're part Irish, part Cantonese. Well, there's definitely going to be green shamrocks, Guinness (if Papa has his way) and rich dark chocolate cake (if Mama has her way). Well, that's exactly what she got... A Guinness-looking chocolate cake with a green shamrock topping!

Varlhona Choc Cupcake with Fluffy Frosting

Two weeks leading up to Baby C's full month, her Mama and I were busy making little fondant shamrocks. I tried my darnest to look for a shamrock cutter but no one stocks it in Singapore! So we improvised with a mini flower cutter and shaped it into a shamrock and we did this 170 times! Talk about labour of love... ok still nothing compares to childbirth labour of course ;p

Mama's intricate hand work

Lucky many times over with this many shamrocks

Looks amazing in a box!

And individually packaged too

Happy 1st Month Baby Clare!

Monday, September 24, 2012

A Girl Guide's Sweet 16

My niece turns 16 this month. When she was born, I was a young adult still trying to figure things out, graduate from uni and contemplate the future. Now 16 years later, I'm a mother and my niece plays with my young ones, the way I had played with her as a baby. Talk about coming full circle.

Her dad (my brother) requested a special cake for her sweet 16. She's a Girl Guide and we figured a cake reflecting her time serving as a guide in school would be fitting in the year that she is about to graduate. So he passed me her guides uniform and I decided to make a cake featuring the many badges that she's accomplished over the years.


It's very interesting what some of these badges signify.
Top row from left: Boatswain, Entertainer, Map Reader
2nd row from left: Pioneer, Toymaker, Local History
Well done L ; )

My niece has many other badges but this Aunty could only fondant so many. But there is one particular one she qualified for but for some reason didn't get the badge yet. It's a swimming proficiency badge. So I figured she could get one on her cake.


Making badges, stickers, stamps and flags with fondant is lots of fun! I have Steph Tan to thank for this since she got me started with the suitcase cake. These badges are not very big so it was a bit of intricate work trying to get the details in. The trouble I had with this was the wording 'GUIDES' at the bottom of each badge, it was way too small. In the end, I used my newly acquired mini alphabet embosser to press in the letters.


My niece likes the rainbow cake, in fact, I made that for her birthday last year but I had not perfected stacking the multi-layered cake then so this year, she was going to get a nicely constructed, well decorated rainbow cake.

A rainbow inside this guides' cake
Badges waiting to go on

I tied a mustard-coloured ribbon around the cake for the scarf that guides usually wear. As you can tell, my knotting skills would hardly meet guides standard...I won't be getting a badge for it but you get the idea. Here's the completed cake embellished with L's guides achievements...

Happy Birthday Laura!
Our Sweet Guide

Sunday, September 23, 2012

White Disc = Frisbee

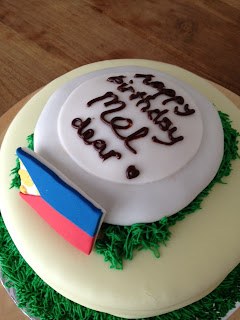
This is a one cake that will require some explanation. I got a very specific brief for this cake. A birthday cake for someone special, she's Filipino and she loves Ultimate Frisbee.

When I was researching this cake, it seemed all frisbee cakes just feature a disc (doh!) and unless you knew you were specifically looking for a frisbee cake, it would be pretty tough to say for sure what it is. (I tried it on my brother, I showed him the finished product and frisbee did not come to him immediately). I found a frisbee cake on cakecentral.com that I thought was quite clever – it incorporated grass into the design as frisbee is usually played in an open grass field. So anyway, I went ahead and built the cake. First a simple round cake as the 'stage' and then a smaller white disc of cake, covered in white fondant. I was going to pipe the birthday message on the frisbee itself.  

I also found myself making the Philippines flag two weeks in a row. If you read my post last week, you'd see that I had made a suitcase cake with emblems from around the world. What I didn't realised was that I had made the Philippines 'war flag' (gasp!). I learnt from my fellow blogger mum Eve that when the red strip is above the blue, it means the country is in a state of war. Upon reading more, I was consoled by the fact that even USA got it wrong - read this ;p 

Now that I'm wiser and given the chance to do this again, I made sure I got the flag right, with the blue on top.

At peace 

The trick with the frisbee was to make it look like it's slightly off the surface. I did this by piling in a support column and then fixed a 'cap' at the top for the disc to rest on. It was the husband that came up with this construction plan and it worked like a dream.

The very useful oreo cookie again

Then I wrapped my small disc of cake with white fondant and placed it at the top together with the flag. And here's the finished cake...


Happy Birthday Mel!

Admittedly, I could have added a few concentric lines on the white disc to make it look more like a frisbee. Well, now that I've explained this cake, do you think you'd have gotten frisbee at first sight? Tell me what you think ; )

Monday, September 17, 2012

Wanderlust

When Steph of aphotoadayproject.blogspot.sg contacted me for a cake for her girls' birthday party, I was totally drawn into her party theme - "Around the World"! Steph is a globetrotting photographer and it seems fitting that she was putting together a party that would feature countries like Egypt, Japan, Philippines, Malaysia, Brazil, France and Singapore, where she is based.

I got the brief for a suitcase cake - one of those old-fashioned buckled cases with stamps from around the world. It's definitely one of the most interesting cake orders I've taken on! It's a large cake too, a double layer chocolate cake measuring 15" wide - that's a whole lot of chocolate cake!

Steph was very kind to take a chance on me as I was not sure if I could pull this off. But the more I researched, the more I got into it. I was going with a brown leather suitcase, complete with straps and buckles and corners. Then I asked if there were any special stamps/stickers that she would like on the suitcase so it could be more personalised. Here's what Steph sent me...


And here's my fondant translation...

Stickers ready to go

My favourite sticker is the Japanese one with Mount Fuji. I love how the flag incorporates the snow-capped icon. Creating these sticker stamps made me think of the amazing places in the world that I've visited and Japan is definitely one such destination. 

Japan - Mt Fuji

The sticker I'm most proud of is the French one. Again the flag features the icons of the country like the Arc de Triomphe, the Eiffel Tower and Basilique du Sacre-Coeur. I visited France just last year when I was 5 months pregnant and we took Jake who was about 15 months old on a road trip!

Vive la France

With most cakes, you really can't start on it till pretty much the night before delivery. This is to ensure freshness and to minimise any 'accidents' while the cake awaits collection. So I started 'packing' this suitcase only the night before the 'trip'.

Packing in the chocolate
Putting in the details

I was wondering how to include those eyelets on the buckle strap, then it occurred to me - a drinking straw should do the trick! Sometimes the solution is in the ordinary everyday things. It was just the right size and made perfect little circles. I also had the Wilton tool kit that gave me the stitching wheel, so I could add in the seams for the leather trim.

Distressed leather
Have luggage will travel

I was really happy with how the suitcase turned out and applying the country stamps was super fun! The husband was very encouraging, he said he was tempted to grab the handle and go!


Ready for check-in

The next morning, the suitcase was waiting for pick up when I noticed something was missing. There should be some form of identification - i.e. the birthday girls' names. So I quickly made a simple tag and inscribed the girls' names on the bag.

Happy Birthday Ginger & Pepper

This is a timely cake to make as I'm making plans to satisfy my own wanderlust. I'm off to the land of gelato next month. I'm sorry to have to decline the enquiries for orders in October. In place of baking, I'll be loading up on tiramisu, panna cotta, limoncello and gelato. But please do get in touch with me again for orders from November onwards. Thanks!

Wednesday, September 12, 2012

Coming soon!

The past weekend was a bit of a break as I had a postponed order that I'm currently working on for Saturday (can't wait to blog about the cake, so stay tuned!).

The break is all very timely as I became an auntie again! My sister gave birth to a beautiful little girl and we've been busy being charmed by her. No prizes for guessing who will be baking her full month cakes ; )

My niece is part Irish, so naturally I'm planning some green-leafed theme cupcakes. I had scoured online shops for shamrock cutters and dainty baking deco for her first month!

Shamrock for luck!

You can check out the baked goods at the end of September. It will be a green and white affair with chocolate and maybe even Guinness in the mix! 

And here's a peek at what I'm working on for this Saturday...

Wunderlust

Wednesday, September 5, 2012

Last Minute Requests

Sometimes you just can't say "No", especially when the request is fun one. I received two last minute orders this weekend that I found very hard to reject.

I was contacted by a mummy who was preparing her little girl's 3rd birthday and the theme was Dora the Explorer! She had already gotten a Dora cake but wanted to offer some themed snacks as well. Remember those cookies I made for Eve's Stripes and Spots party, well I was asked to customise cookies for the Dora party. While I've made some decent character cakes, I haven't really tried them on cookies. Plus cookie icing is also something relatively new to me, but I'm always game to learn something.

I made a batch of Cinnamon Raisin Cookies and a good amount of white poured cookie icing, using the Wilton recipe (I love Wilton). The icing dries to a shiny, hard finish, and the best part, it was so simple to make:

Poured Cookie Icing
- Mix 1 cup icing sugar with 1 tablespoon milk and 1 tablespoon clear syrup
- Tint the icing with colours as required

I used this for Dora's hair and face.


Dora's hair colouring

I used a piping gel transfer to get Dora's outline for the first few cookies, then I got a bit ahead of myself and thought I could do it freehand. It wasn't half bad, but let's just say I'm no freehand artist.

Dora on cookies

I was quite pleased with how it was turning out till I realised the face icing may have been a bit too thin as it started to look a tad translucent upon drying. The surface area also posed a challenge as it was a tad too small to pipe the features clearly with icing. So I called on the Americolor gourmet pen and decided to draw in the features instead.

Dora the Explorer cookies

She's a star

I made stars with the extra cookie dough and piped the No.3 for the birthday girl. I was going to individually pack these cookies but my environmentally-conscious client rather I didn't. So I had to rethink how I was going to transport these cookies. In the end, I had them lined up on a cake board that usually comes packaged in a plastic wrap. These plastic wraps sadly get thrown out most of the time, but in the spirit of recycling, I reused it to bag the cookie on the board. Thanks Shir for making me rethink the packaging ; )


Request No. 2

I received an email from a lady hoping to get hold of a rainbow cake for the weekend. She had probably seen my earlier post on it and it's definitely been a while since I made this happy cake. The good thing is that she didn't require any special decoration, but then again, all the delight is within the cake itself already. What made me finally take up the order is that it's for her birthday! You can't say no to a birthday girl ;p

Here's the cake before frosting...

Colourful Delight

She had very kindly sent me images of the cake after cutting into it so I'm able to share the joy of slicing up a rainbow cake with you, check it out...

Tada!

Monday, September 3, 2012

Cupcakes & Toppers

The last few weeks had been all about decorative fondant cakes, so I was looking forward to this weekend's order - cupcakes and paper toppers!

This was my first order of 1st Month cakes. A mummy contacted me to make 48 chocolate cupcakes with peanut butter swirl – she obviously liked what I did with Cakes & Craft, so she suggested cupcake toppers with her baby girl's name and a simple message.

I whipped up my trusty moist chocolate cake for the cuppies and prepared that luscious peanut butter frosting that is practically unadulterated apart from Nutella for sweetness. Then I used a 2C Wilton piping tip and swirled pretty roses on top of each cupcake.


Peanut Butter Roses

The best part about preparing this order is making a trip down to the scrapbooking shop to look for pretty paper. Instead of the usual pink for girls, the request was for buttercup yellow. So I scoured the shop for something girly and happy. Looky what I found... this lovely double-sided art card.

So happy indeed!
I created the round printouts with Isabel's name and date of her 1st month celebration, as requested by her mummy. It was a pretty combination with the white polka dot on yellow.

Isabel's 1st Month

Here's the complete box of cupcakes with toppers. The fun part is the double-sided pattern where I flipped the other way for variety! And the back view looks just as good too ; )

All lined up
A sweet momento

I was so pleased with completing these for delivery that I totally forgot to bring some extras promised for my client's own tasting. So mummy D, if you're reading this, you have cupcake credit with me. Call me!