Sunday, November 25, 2012

Doing the Ombre

As I was saying, it's a Rainbow week. One of the cakes is for Eve of thebottomsupblog.com  and she's been eyeing a rainbow cake for a while so her hubby's birthday was the perfect excuse for one. She requested for the layers between to have enough white frosting for the rainbow layers to stand out. Here's an amazing pic she sent me for an example.


Now I usually use cream cheese frosting, which doesn't give that distinct frosting layer but it's just enough to separate the colours. And although cream cheese starts out white, it somehow becomes pale yellow after whipping with sugar and some cream or butter. Still, it really taste the best among all the frostings.

However, for this purpose, I was going to abandon the cream cheese and try to make a super white frosting. I know I can achieve this with traditional buttercream made solely with shortening and icing sugar but it's just something I personally won't make - shortening is not the healthiest thing and it taste really synthetic. So I turned to my trusty meringue frosting (or fluffy boiled frosting). Made from meringue powder (egg white) and boiled sugar, it's whipped into a heavenly light marshmallow cloud that is perfect to achieve the above look. Unfortunately it didn't hold the layers as well as I would have like it to as it was a much softer frosting than buttercream or cream cheese.

Meringue frosting between layers

We were discussing how to decorate this cake when I suggested an idea to Eve. I've been wanting to try my hand at an Ombre cake – something that I came across while looking at the many baking blogs for inspiration. She liked the idea and off to work I went.

Ombre in the making

The textured look

Ombre means the multiple hues of the same shade of colour. It's a lovely technique that looks stunning and almost seems like a monochrome rainbow. I used cornflower blue for this ombre and made 3 shades of this blue finishing with the white. There's a great tutorial from thehungryhousewife.com that shows a step by step method on achieving this look. It's my first attempt and it was not as difficult as it looks at all.

Here's the completed cake...


Happy Birthday Alf

Sadly, I was told the cake had slid during transportation and the frosting was somewhat ruined :(  I'm going to work on the cream frosting again for better holding power and maybe I should also deliver this cake myself. Nonetheless, I hope the rainbow inside made up for it.

Monday, November 19, 2012

Rainbow Week

I'm having another great week of baking as most of my orders are calling for the Rainbow cake, one of my most favourite cakes to make (and eat).

My friend had organised a farewell school party for her daughter who is graduating from kindergarten. It's a great gesture as these children who have been fellow playmates for years will now say goodbye as they embark on Primary 1 next year. 

The cake to mark the occasion is a pastel coloured rainbow cake, with happy cloud decorations. It's a wonderful choice as the rainbow cake never fails to bring on cheers and smiles ; ) And it also symbolises good things to come!

This is the first time I'm adjusting the colour intensity to try and achieve a pastel-coloured rainbow. Usually, I would use enough Wilton food colour to produce an intense hue for each layer. By doing so, it also helps overcome the fact that the cake batter is originally yellow, so you'd need to add quite a bit of blue colouring anyway to make sure that the batter is really blue and not green (blue + yellow). So in the case of a pastel rainbow, a bit more colour mixology is required. For the blue, I used cornflower blue plus a drop of turquoise to make it a muted blue, even the violet requires a bit of tweaking. The result was not bad, but upon some reading up, I could have made a super white cake batter by leaving the egg yolks out. The only thing I don't like about that is, what am I to do with 12 egg yolks? 

So anyway, I stacked the layers starting with the lavender (violet), then blue, green, yellow and pink. It's all held together with cream cheese frosting and then crumb coated with a layer of buttercream for where the fondant meets the cake. 

Frosted cake layers

I like how it looks like a snow white cylinder. After this, I applied a layer of white fondant. While it's a regular 9" round cake, the height stacked up to about 5.5cm, this means a sheet of fondant about 20cm wide is required. I always have trouble rolling a large piece of fondant, which means I'll always have problems with the edges when covering the cake.

Sweetheart Coulds 

Here's the completed cake. One thing about rough edges is knowing how to cover it. In this case, I plastered pink fondant hearts in different sizes for the border and added marshmallows for the cloud effect, though I wished the marshmallows were round instead.

Soft colours make a sweet cake

For the Class of 2012... good luck kids!

I'm definitely more confident now with sculpting pieces especially since I've learnt to use gum paste. For the rainbow featured here, I made it with gum paste as it would dry hard enough to stand on the cake. I can't wait to try other 'upright' designs soon.

Somewhere over the rainbow...

And there were cupcakes too!

Rainbow revealed

I was told the kids went "Wah" when the cake was cut into... and I can imagine the smiles on their faces too.

Friday, November 16, 2012

The Very Hungry Caterpillar

When my elder boy Jake was a wee tot, I introduced Eric Carle's Hungry Caterpillar to him. The book was first published in 1969 and has since become a mainstay in children's libraries and preschools all over the world. Eric Carle, the author and illustrator, has a great artistic style that is immediately recognisable and the stories are fun to repeat! The Very Hungry Caterpillar is definitely one of our favourite books. Jake used to chuckle at the greedy caterpillar as I read the story to him and got amused at all the things the caterpillar munched through in his week-long feast toward becoming a butterfly.

Now my little boy is a little more grown up, Nursery 1 to be exact, and for his year-end concert in school, I was absolutely chuffed to find that his class was putting up a concert on The Very Hungry Caterpillar. Jake was one of three caterpillars and his friends were a variety of yummy fruits and a pretty butterfly!

It was the perfect opportunity to bake something for the children and I decided to make cupcakes with the hungry caterpillar on it!

I whipped up some Hummingbird cupcakes, full of sweet ripe bananas and tangy pineapples that no caterpillar could refuse. Then tinted the cream cheese leaf green and swirled it lightly on the cupcakes. Then I made a darker green buttercream for the caterpillar's body and a little red M&M for the head. The eyes and smiley face was drawn in with my Americolor gourmet pen and rice chocolate stuck in for feelers - easy peasy!

Hummingbird cupcakes featuring a hungry caterpillar

The Very Hungry Caterpillar

My little caterpillar

Tuesday, November 13, 2012

♥ Hello Kitty ♥

My friend's daughter Aeriel, the recipient of the My Little Pony cake, requested for a Hello Kitty cake for her birthday celebration in school. If you read my earlier post, you'll see I made a cream cheese frosted Hello Kitty cake for another little girl. The feedback I got was that while they enjoyed the cake, it didn't really look like Hello Kitty. Some kitty fans I know even told me it was a poor attempt. Well I thrive on feedback and challenges so I was eager to have the opportunity to give kitty another go.

This time round, I made Kitty with gum paste and fondant. You'll see why it is the preferred ingredient, it looks almost like the toy. You'll never have that smooth and neat finish with cream, hence my first kitty looked a little melty and perhaps my proportions weren't the best. Still I would recommend fondant for Hello Kitty orders from now on, even if it's going to be on a cream cheese cake. 


Hello, Kitty!

I baked a four-layer chocolate cake in a heart shape and had it covered in the softest shade of pink fondant. It's the first time I'm covering an irregular shaped cake and I have to say, it wasn't as difficult as I anticipated, but I did run into a troublesome spot - the tip of the heart. So what's a girl to do? Add on more hearts of course! Something I'm sure the birthday girl would be more than happy to have.

Work in progress


I also had Aeriel's name set on a heart. Instead of piping or stencilling, I decided to roll out a long piece of fondant and try my hand at some font-making. I was glad to hear that Aeriel signs her name with a heart for her 'i' too. 

Aeriel ♥ Hello Kitty


It was pure joy assembling this cake. It's girly, sweet and oh so Sanrio! For this order, I bought a really  pretty Hello Kitty cutter. It produces such a nice Hello Kitty shape that I made two with fondant to embellish the sides of the cake. I'm definitely looking forward to using them again!

No such thing as too many Kitties on one cake

Happy Birthday again!

♥ Hello Kitty ♥

To all Hello Kitty fans reading this post, tell me what you think? And do share any kitty cake ideas that you may have with me. 

Sunday, November 11, 2012

Epic Cake!

I took on an ambitious order and think I may have made 'The Cake' to date.

It was so nice to hear from an old school mate - she found out that I had this cake venture so she contacted me for a series of cakes for her daughters. Doesn't seem that long ago we were a couple of blue-uniformed schoolgirls running around CHIJ ; )

My friend's daughter celebrates her 5th birthday this month and I had the pleasure of baking her a My Little Pony cake! I remember the pastel-coloured ponies from my own childhood and I absolutely love the flowers, rainbows and hearts that surrounded the ponies. I went on to plan a cake that I would have loved for myself when I was 5 years old.

The birthday girl wanted Pinke Pie, Twilight Sparkle and Rainbow Dash on the cake. She also wanted flowers, hearts and ribbons. I don't' have daughters, my two sons want trains, trains and trains. So you can imagine my excitement at making this cake.

I quickly got to work on the embellishments.
First the flowers...

Little pansies in colours of the rainbow
Then the rainbow, hearts and bow...

Hearts are fun to make


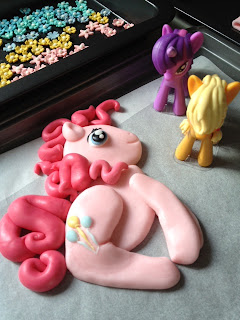
Next comes the main feature... Pinkie Pie! In the days leading up to Pinkie Pie, I had actually gone to a party supply shop and found My Little Pony cake toppers! They were beautiful so I bought them and looked at them long and hard. There was no way I could have done a 3D pony with fondant or gum paste that would come close to the toppers. So I relented and decided to use toppers (my friends all say - "There's no shame in it!"). Still I could not accept not making a pony with fondant. So I decided to make Pinkie Pie myself. To differentiate from the toy toppers, I decided to make her 2D but work on her mane so it looks like it's blowing in the wind.

Pinkie Pie

I had her set on the top tier as the main feature...

Riding on a chocolate cake


Looking at this picture now, I kinda like the simplicity of Pinkie Pie on a plain fondant covered cake. But this was going to be my epic cake, so this is really just the start of putting it all together.

Rainbow delight 

The bottom tier is set on a plush buttercream green grass field dotted with flowers where Little Ponies run free. A pretty fondant rainbow brightens the design and adds extra sweetness.

Here's the complete stack. Notice the hearts on the cake, they stand out instead of lie flat on the cake. I got around to using gum paste and managed to make these hearts. They are great coz they harden up much better than fondant and could be used without losing its shape.

My Little Pony Paradise


Happy Birthday Aeriel


Wednesday, November 7, 2012

Hello Kitty!

I knew it was a matter of time before the famous Japanese bobtail kitty cat finds me and my baking adventures. A friend recommended a mummy to me for a heart-shaped banana cake with Hello Kitty on it. The cake is meant for her little girl's birthday celebration in school, so I made a double layer heart-shaped cake and 12 cupcakes for the kids.

I love heart-shaped cakes and I've got a great silicone pan that consistently produces beautiful heart-shaped cakes. It's not often that I get a request for it, so I was delighted at this order.

This was going to be a fondant / cream cheese challenge again but because it was going to be picked up the night before the party, I was afraid it may have to go into the fridge because of the cream cheese. There is one thing worse than cream cheese for fondant and that is REFRIGERATION. Fondant doesn't do very well in our weather but putting it in the fridge just makes it sweat and weep its colours so don't ever put it in the fridge. And since we will NEVER have Californian weather , I always just recommend air-conditioning.

After frosting the heart with cream cheese (mmmm), I placed the carved Hello Kitty on top and decided to frost it in a whiter shade of sugar icing. Then I outlined Kitty's face with royal icing to give a definitive look. The birthday girl loves the colour yellow so the cream cheese was tinted buttercup yellow for the border piping. The result is not too bad but you can see why fondant is still a favourite when you want to achieve that clean and neat finish.

Hello Kitty
Happy Birthday Joie!

I have another Hello Kitty order coming up soon and will be trying the fondant approach next.
Stay tuned for more!

Monday, November 5, 2012

Little Red Corvette

Ok, not exactly (a red corvette). But it's a little red car nonetheless for a little boy who turns 2.

A friend had referred a mummy to me - she was looking for a healthy treat to be shared in school for her little one's birthday. She was keen on a fruity cake with reduced sugar and fancied the Hummingbird Cake... it couldn't be a better choice! She didn't favour the pineapples in the original recipe, so I had it replaced with mangoes. It was a yummy substitute and because mangoes are naturally so sweet, I easily reduced the sugar in the recipe by 50%. The resulting cake was also very moist - banana and mango is such a great combination, who'd have thought ; ) And in place of sour cream, I added fruity yoghurt, which is way more healthy!

Little Keith must love cars since his cake requirement was simple - a little classic red car on a rectangular cake. That's the best shape cake for school since it makes for easy cutting and serving.

I made a double layer cake measuring 13" by 9" and another smaller layer for carving into the shape of the car. I went with the Volkswagen beetle shape car just because it looks cuter and had it covered in fondant for a neater finish. The rest of the cake was generously frosted in light cream cheese.

Delicious ride

Happy Birthday Keith!

The style of this cake is like the penguin cake I made some months back, though there is one huge challenge to this - fondant and cream cheese do not like each other at all. While I love cream cheese frosting more than any other frosting, it is just not possible to apply fondant to it. Fondant breaks down when it comes into contact with cream cheese and becomes a total mess! Still it is possible to be creative and incorporate the two popular ingredients. The trick is to create a barrier for the fondant - in this case, I used a royal icing-like frosting where the fondant car is sitting on.

This is having your fondant and eating it with cream cheese ; )

Sunday, November 4, 2012

November is Birthday Month!

November is a big birthday month! My boy Jake will be turning 3 and a few of my friends are celebrating their little one's birthday as well so it's going to be a busy month with quite a few exciting cakes for me to work on.

First of, I would like to apologise to those of you who tried to contact me for orders in the month of October. As you can tell from the lack of updates in October, I was away on vacation with the family. While we had a great time feasting up a storm in Italy and Shanghai, I did miss my baking and blogging and being in touch with readers who were kind enough to enquire about my cakes. Well, I'm now back and one of the first cakes I made upon returning is for a good friend's daughter.

While preparing to make Lauren's cake, I was introduced to the world of 'Bubble Guppies'. For the unacquainted, Bubble Guppies is a popular preschool comedy musical children's television series by Nickelodeon. We had Sesame Street in the 70s, they have Bubble Guppies in 2012.


Lauren actually had a birthday cake for her party made by another very talented baker mum. It was a gorgeous 2-tier Bubble Guppies cake (unfortunately I don't have any pictures) but I had the pleasure of making a similar theme cake for her school party ; )

I decided to make one of the Bubble Guppies characters that wasn't on her party cake - Mr Grouper!


I used tracing paper to capture the shape for the fondant cut-out that was going on the cake. It was easy enough... Mr Grouper sure was good fun to make.

Mr Grouper on tracing paper

Actualising Mr Grouper with fondant

Happy Birthday Lauren

I made little bubbles, seashells, starfishes, and swaying sea plants to embellish the sides of the cake. That blue on the fondant is one of my most favourite colours. Inside is a moist chocolate cake made with Valrhona cocoa and a rich chocolate ganache filling.

I'll gladly make this cake again ; )