Pages

Saturday, December 22, 2012

It's a Wrap!

As 2012 comes to a close, I look back on the year in complete wonder and fulfilment. I never expected to be a stay home baker, but the cakes, cupcakes and cookies found me. With Christmas approaching, I took up 2 of my biggest orders yet... 20 Chirstmas loaves for Dogtech and 300 Snowman cookies for DDB!

Originally, the request was for log cakes but I could not roll a sheet cake to save my life so I conjured up my own version of a Christmas fruit cake - a hearty Banana Cranberry Walnut loaf. In truth, I wanted to make something easy to pack that will keep nicely without refrigeration as it needed time for delivery to be done. The biggest plus is how the wonderful aroma of cinnamon loaves baking made my home instantly festive!

One of the fun things about baking for Christmas is the packaging! I snowed on icing sugar for the loaves and had it gift-wrapped Martha Stewart style. I love her bake tray packaging but it's not available in Singapore so I adapted it and made my own!


Tin trays wrapped in parchment

Sealed with a red scallop cutout

Ribbon it up

It's a wrap!


For the snowman, the task was somewhat daunting. I've never made 300 of anything. I prepared the cookie dough a week before baking and realised one dough ball only produced about 20 cookies, which means I had to make 15 portions and find the fridge space for it! The baking alone took a week.

This was how intense the baking got, my neighbours came asking what was cooking in my kitchen... they could smell the cinnamon butter cookies from their homes ; )

After baking the snowman, the next step was making them Mr Frosty. Now, I would usually pipe an outline then fill the cookie icing in but when you have 300 cookies to frost, you ned to find an efficient way to do this. I went online and loved the method this lady used, check out her spoon-on technique.

Mr Frosty taking shape

I underestimated how big a production 300 snowman is, well it's huge, so I actually had to borrow space to do this. I shipped them off to my sister's and had her kind help in housing and decorating them.

Long line of Frostys

Frosty everywhere

The dress up

Frosted and packed

It's a wrap!

All Christmas goodies shipped, and I was told enjoyed by the recipients. Yay! That's all folks for 2012.

Merry Christmas and Happy New Year ; )
Stay tuned for more in the new year...

Monday, December 17, 2012

Me Want Cookie!

Aha! Finally, someone's asked me to make a cookie monster cake! I was absolutely delighted as I love the Cookie Monster as much as I love Elmo and since I wanted to add to my Sesame Street characters in cake collection, I couldn't wait to do this!

It's pretty much the same as making Elmo, except Cookie Monster does not have a nose... he is however, a very distinct blue, which could easily achieved with Wilton's Royal Blue gel colour but the frosting has to be absolutely snow white! There is only one super white frosting I'd make – a fluffy meringue frosting. The result: a gorgeous blue and it looks perfect on a chocolate fudge cake.

Cookie Monster Blue

The frosting went on quite nicely, I was able to make little furry swirls with this fluffy meringue frosting. However, as it sat on the counter waiting for pick up, it started to become a little soft and was a bit too melty :( Funny thing when I did Elmo some weeks back, I didn't have this problem with the meringue frosting. It was admittedly a very humid day today but I suspect it could have something to do with the frosting having been in the fridge for a while before I added colouring.

The hubby felt my pain as I lamented at the effort wasted in creating the furry swirls, that's when he suggested adding something that would hold up in our heat! Well, the simple answer is shortening, it is the one thing that would not change no matter how hot or humid... well, it holds up in the heat for a reason and trust me, you wouldn't want to eat the stuff or worse, feed it to your kids!

Anyway, enough of my ranting... here's Cookie Monster and of course, he would not be complete without some cookies for the gobbling ; )

Happy Birthday Tristan

I made some cookie monster cupcakes too, but those were a sadder melty mess - too much frosting, too little surface area. I hope the kids enjoyed it all nonetheless... om nom nom nom


Thursday, December 13, 2012

Cakes in a Jar

Some weeks back, my friend Eve (thebottomsupblog.com) got me to bake a rainbow cake for her hubby, I blogged about it here. She had put together a rainbow themed party with a dessert table that was totally eye candy, you can read about it at her blog.

Now to back track a little, Eve had actually asked at that time if I could try baking in jars. She found a great idea online to make little gifts out of cakes in jars. She wanted the rainbow cake to be inside individual jars that could be given away to her guests at the party, which is genius!

Unfortunately, I just didn't have the time then to try it out and we couldn't get the most appropriate jars for the job. Well Eve, I just gave it a shot with those nifty Ikea mini jars and it turned out brilliant :)

This is what I did...

Prepare the rainbow cake batter and placed the individual coloured batter in piping bags.

Colours ready to go

Before using the the glass jars, sterlise with hot water and then make sure it is completely dry. Then grease the inside with a little butter or canola oil.

Recognise these jars?

Fill the glass jars one layer of colour at a time. Make sure to press the batter against the wall of the jar as that will give you the coloured layer look. Admittedly, these Ikea jars are not the best glassware for the job - it's irregular shaped and the opening is narrow. For best results, get straight jars with large opening.

Fill to the half way mark

These jars are too full 

As you can see from the picture, my jars are too full - ideally they should be 50-60% filled, leaving room for expansion. There was major overflow while the cakes baked but with some cleaning up, it turned out alright.

Jar full of rainbow

I made these for my dear cousin's surprise birthday. I decorated it with her name using art paper and glitter crayon. There's so many ways you could dress up these jars, they really do make great gifts!

Happy Birthday Gopi

Eve, thanks for sharing this great idea! You have cake credit with me ; )


Sunday, December 9, 2012

It's BATTER @ Home

My sister was having a tea party this weekend at her place and she was hoping to serve up some freshly baked chocolate cupcakes for her guests. Short of having her own personal baker (yours truly) at the party, the next best thing was to have a ready batter where she could stick it in the oven half an hour before serving it!

Since I could not be there, I whipped up a portion of moist chocolate cake batter and provided her the cupcake tray with cupcake liners. All she needed to do was fill the cups (two-thirds full) and stick them in the oven at 175 degrees for 20 minutes and there you have it... freshly baked chocolate cupcakes that make Betty Crocker look like hard work!

She was so pleased with how it all turned out and her friends loved the cupcakes served piping hot with ice cream. She felt like almost a baker.

This gave us a brilliant idea especially for those of you who have ovens at home and always wanted to bake something yummy in it – bring batter home for the freshest baked goodies. I can prepare your cake batter packed into a convenient container, provide you with basic necessities like cupcake liners, disposable pans, temperature instructions, etc and all you have to do is bake it yourself at home.

* Just one caveat, I'm aware that the chemical reaction in leavening takes place once the ingredients are mixed and therefore should be baked soon after. The batter should be used within a few hours. Having said that, my sister stuck some batter in the fridge and baked it the next day. Result: still as good :) 

One portion of chocolate cake batter

Ready to go

My dear sister has very kindly documented her baking step by step... if she can do it, err, anyone can (sorry sis) ;p

Step 1: Fill your cupcake tray, pop it into preheated oven (175 degrees) set for 20 minutes.

Fresh cupcakes in 20 minutes

Step 2: While the cupcakes bake, chat to your guests till they smell the warm sweet wafts of baked chocolate 


Nicely done

Step 3: Serve your guests and wow them with your presentation

Chocolate cupcake with Vanilla ice cream

Let me know if you're interested to do this, I'll be more than happy to prepare the batter for home parties and I can supply everything you'll need to do this at home.

It's batter at home!

Tuesday, December 4, 2012

Castles for Princesses

I've always looked at princess castle cakes and thought to myself - That is just way too difficult! There's simply too many details and construction required to make a home fit for a princess. So you can imagine my trepidation when I was contacted for a princess castle cake.

A mummy who found me online wanted a rainbow cake for her daughter with a princess castle theme. It's a busy week (and month) for me so I told her honestly that I just didn't have the bandwidth to take on the bake job. However, I couldn't bear disappointing anyone especially since she was looking forward to a rainbow cake, so I suggested baking just the round cake with a simple design and she can find her daughter's favourite princess and castle toppers, which I'm sure would look perfect. I was glad she took up the idea coz I knew the toppers would do more justice than my many hours trying to make this work.

As luck would have it, the shops ran out of the castle toppers.

Desperately-seeking-castle mummy contacted me and asked if there was any way at all that I could craft two castles to add to the cake. She managed to get the princess toppers but it wouldn't be the same without the castles. She even sent me resource links and images for ideas on how to craft the castles! I have to admit, my interest was definitely piqued but more importantly, I couldn't possibly leave her stranded! Though it's a crazy period now leading up to Christmas, I found myself looking at youtube  for how to make a castle cake (and there are plenty!)

While looking at how I could do this, I found a website on how to coat the ice cream cones for the castle. The baker had a wonderful description of how she went about building her castle cake, it's a great one - check it out here. I like how she coated the cones with royal icing and rolled it in disco dust! And that's just what I did...


Pink Peaks

The royal icing dried smooth and hard which made it easy to handle for construction. And I love that pink (Americolor Soft Pink). It was a day of just playing with ice cream cones. These inverted cones easily fitted into the fat wafer cones you get with Macdonald's soft-serve ice cream, once that is done, you'll already get the basic idea of a castle tower.

Castle Cones

I made five castles with graduating heights to surround the back of the cake. To do that, I looked around my larder and found some wafer biscuits, had them cut to size and stacked to the height I wanted.

Tall, taller, tallest

I just wish I had more time to embellish the towers, as you can see the cones do look a bit naked at the bottom. I made it up by pipping some 'green grass' and sprinkled some confetti flowers to make it look like flower bushes. Another thing I did was put little flags at the top of the tower cone, it's a small detail that didn't require a lot of work but added to the look visually. Simply cut out some art paper into triangles and stick it down with some fondant.

Tower 1

Latest castle development

I had the cake delivered to the school where little Jmie was going to celebrate her 2nd birthday with her classmates. Her mummy met me to assemble the princesses on the cake for the finishing touch. I was told Aeriel the mermaid princess is her favourite, so naturally she got the main spot on the cake.

Sitting pretty

Happy Birthday Jmie

While I came through for Jmie and mummy with the castles, at the same time, I have them to thank for pushing me to overcome this mental block for castle cakes. I've learnt a lot making this cake and wouldn't mind doing it all over again.

Monday, December 3, 2012

Elmo Revisted

Despite the latest bad press surrounding Elmo and his voice over, you can't take away the fact that the furry red monster is still one of the most loved children's characters of all time, and for me, that won't change no matter what. So I was glad to have the opportunity to make an Elmo cake for a friend and her daughter who celebrated their birthdays together.

A year ago, I started my baking venture and Elmo was one of my first foray into novelty cakes. I made it for Jake's 2nd birthday and back then, I remembered the task to be daunting! I spent 3 days prepping and was thrilled with how Elmo turned out - check out my old post here.

This time, the task was more enjoyable than unnerving and it only took a day. I made three layers of moist chocolate cake, assembled it with rich chocolate ganache and frosted the whole cake with a red-tinted fluffy meringue frosting. Then I cut out a piece of baking paper for the mouth before covering the cake in red fluff, much like what you'd do when painting any special corners or spots.

Frost and peel

Always good for a smile

The eyes and nose were made with fondant. They were easy shapes - 2 round balls for eyes and an egg-like shape for the nose.

Eyes without a face

Then put it all together and there you have it... Elmo :)

Happy Birthday Isabel and Eunice

Sunday, December 2, 2012

Another year older

My son turned 3 last week... where did the time go!? I remember last year this time, I was making one of my very first novelty cakes – an Elmo cake for Jake's 2nd birthday! Then 8 months later, my younger son James got a two-tier fondant Thomas the Train cake. And all the cakes made between then and now for good friends and new friends have been such an amazing experience! I'm constantly thankful for being able to stay home with my boys while pursuing my passion for baking.

So what did Jake get this year... well, he didn't get just one cake, he got three!

Cake No.1 
Here comes the rainbow train...

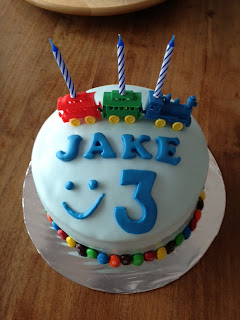
I made a simple round cake and covered it in baby blue fondant. Inside is Jake's favourite rainbow cake; multi-coloured layers of vanilla butter cake with cream cheese frosting! I found an amazing train candle holder that I know Jake would love to have on his cake. It's a great toy too since you can chain link all the trains - it comes in 5 colours! Then M&Ms for the border and a happy face on his cake. It was simple enough but oh so fun to look at and play with after.

Happiness in a cake

Cake No.2
Thomas and friends
Trains and tunnels

There is no running away from a Thomas the Train cake. Jake's love for Thomas is still as fervent as ever so it would be unthinkable to not make a Thomas cake for his birthday. I opted for an easy way to do this cake. I found some cupcake toppers of Thomas, James and Percy (all his favourite trains) and so I decided to just set the scene with the cake. Now if you recall a recent post on gum paste where I made a standing rainbow, you'd know why I chose to make a brick wall. However, I have to say I'm quite disappointed with the Satin Ice brand of gum paste, it didn't dry out hard even after a whole night of air-conditioning! Sadly the brick wall was not as sturdy as I would have liked it but some toothpick foundations did the trick. I'm sticking with Wilton from now on.

I also love my brick wall embossing pattern, it turned out very nicely. Then I made three little tunnels from which the trains look like they are emerging. The tracks are made of chocolate Kit Kat pieces - many of which ended up in the mouth as I chugged along. The cake was simple enough, not my best effort but it made the boy's day nonetheless ; )


Cake No.3
I actually forgot to take a proper pic of this third cake. It was a rainbow cake of course. Here's one of the boy and his cake at school. 

Happy Birthday Jake


Sunday, November 25, 2012

Doing the Ombre

As I was saying, it's a Rainbow week. One of the cakes is for Eve of thebottomsupblog.com  and she's been eyeing a rainbow cake for a while so her hubby's birthday was the perfect excuse for one. She requested for the layers between to have enough white frosting for the rainbow layers to stand out. Here's an amazing pic she sent me for an example.


Now I usually use cream cheese frosting, which doesn't give that distinct frosting layer but it's just enough to separate the colours. And although cream cheese starts out white, it somehow becomes pale yellow after whipping with sugar and some cream or butter. Still, it really taste the best among all the frostings.

However, for this purpose, I was going to abandon the cream cheese and try to make a super white frosting. I know I can achieve this with traditional buttercream made solely with shortening and icing sugar but it's just something I personally won't make - shortening is not the healthiest thing and it taste really synthetic. So I turned to my trusty meringue frosting (or fluffy boiled frosting). Made from meringue powder (egg white) and boiled sugar, it's whipped into a heavenly light marshmallow cloud that is perfect to achieve the above look. Unfortunately it didn't hold the layers as well as I would have like it to as it was a much softer frosting than buttercream or cream cheese.

Meringue frosting between layers

We were discussing how to decorate this cake when I suggested an idea to Eve. I've been wanting to try my hand at an Ombre cake – something that I came across while looking at the many baking blogs for inspiration. She liked the idea and off to work I went.

Ombre in the making

The textured look

Ombre means the multiple hues of the same shade of colour. It's a lovely technique that looks stunning and almost seems like a monochrome rainbow. I used cornflower blue for this ombre and made 3 shades of this blue finishing with the white. There's a great tutorial from thehungryhousewife.com that shows a step by step method on achieving this look. It's my first attempt and it was not as difficult as it looks at all.

Here's the completed cake...


Happy Birthday Alf

Sadly, I was told the cake had slid during transportation and the frosting was somewhat ruined :(  I'm going to work on the cream frosting again for better holding power and maybe I should also deliver this cake myself. Nonetheless, I hope the rainbow inside made up for it.

Monday, November 19, 2012

Rainbow Week

I'm having another great week of baking as most of my orders are calling for the Rainbow cake, one of my most favourite cakes to make (and eat).

My friend had organised a farewell school party for her daughter who is graduating from kindergarten. It's a great gesture as these children who have been fellow playmates for years will now say goodbye as they embark on Primary 1 next year. 

The cake to mark the occasion is a pastel coloured rainbow cake, with happy cloud decorations. It's a wonderful choice as the rainbow cake never fails to bring on cheers and smiles ; ) And it also symbolises good things to come!

This is the first time I'm adjusting the colour intensity to try and achieve a pastel-coloured rainbow. Usually, I would use enough Wilton food colour to produce an intense hue for each layer. By doing so, it also helps overcome the fact that the cake batter is originally yellow, so you'd need to add quite a bit of blue colouring anyway to make sure that the batter is really blue and not green (blue + yellow). So in the case of a pastel rainbow, a bit more colour mixology is required. For the blue, I used cornflower blue plus a drop of turquoise to make it a muted blue, even the violet requires a bit of tweaking. The result was not bad, but upon some reading up, I could have made a super white cake batter by leaving the egg yolks out. The only thing I don't like about that is, what am I to do with 12 egg yolks? 

So anyway, I stacked the layers starting with the lavender (violet), then blue, green, yellow and pink. It's all held together with cream cheese frosting and then crumb coated with a layer of buttercream for where the fondant meets the cake. 

Frosted cake layers

I like how it looks like a snow white cylinder. After this, I applied a layer of white fondant. While it's a regular 9" round cake, the height stacked up to about 5.5cm, this means a sheet of fondant about 20cm wide is required. I always have trouble rolling a large piece of fondant, which means I'll always have problems with the edges when covering the cake.

Sweetheart Coulds 

Here's the completed cake. One thing about rough edges is knowing how to cover it. In this case, I plastered pink fondant hearts in different sizes for the border and added marshmallows for the cloud effect, though I wished the marshmallows were round instead.

Soft colours make a sweet cake

For the Class of 2012... good luck kids!

I'm definitely more confident now with sculpting pieces especially since I've learnt to use gum paste. For the rainbow featured here, I made it with gum paste as it would dry hard enough to stand on the cake. I can't wait to try other 'upright' designs soon.

Somewhere over the rainbow...

And there were cupcakes too!

Rainbow revealed

I was told the kids went "Wah" when the cake was cut into... and I can imagine the smiles on their faces too.